
There’s a secret language spoken behind the espresso bar, a subtle nod between baristas that acknowledges a shared, unspoken knowledge. It’s the kind of knowledge that separates a good cup of coffee from a truly transcendent one. And while many of the industry’s best-kept secrets revolve around million-dollar equipment or rare, exotic beans, the truth is that the most impactful techniques are often the simplest, and the most accessible. Today, we’re pulling back the curtain on one of those secrets: a specific, yet surprisingly easy, recipe that elevates your home-brewed coffee to specialty café standards. This isn’t about buying a new gadget; it’s about mastering a subtle shift in your process that unlocks a depth of flavor you didn’t know your beans possessed. It’s the kind of recipe that baristas guard closely because it makes their craft look like magic, but it’s a magic you can perform every morning in your own kitchen.

The core of this “secret” recipe lies in a concept that is often overlooked by home brewers: **controlled thermal shock** combined with a specific **pre-infusion ratio**. Most people simply pour hot water over their grounds and let it run its course. The barista’s secret, however, is to use two distinct water temperatures and a precise, short bloom phase to manipulate the extraction process. This technique is designed to first gently awaken the grounds, allowing the CO2 to escape evenly, and then to hit them with the perfect temperature for optimal flavor extraction. It’s a delicate dance between heat and time, ensuring that the volatile aromatic compounds are preserved while the desirable sugars and acids are fully dissolved. This two-step temperature approach is the key to achieving a cup that is both incredibly complex and surprisingly smooth, avoiding the common pitfalls of bitterness or sourness.
The Anatomy of the Secret Brew: Precision Over Power
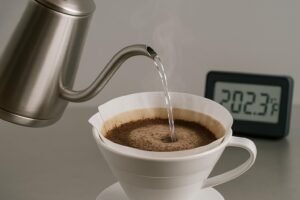
To execute this recipe, you need to think less like a casual drinker and more like a chemist. The goal is precision. You will need a reliable digital scale (to measure both coffee and water) and a thermometer (or a kettle with temperature control). The recipe is optimized for a pour-over method, such as a V60 or Chemex, as these allow for the greatest control over the pour. The ratio we are aiming for is a standard 1:15 (coffee to water), but the magic is in how that water is introduced. The total brew time should be between 3:00 and 3:30 minutes, but the first 45 seconds are the most critical. This focus on meticulous measurement and timing is what separates the casual brew from the professional-grade cup. It’s a commitment to the craft that pays off in every single sip.
Step 1: The Gentle Awakening (The Thermal Shock)
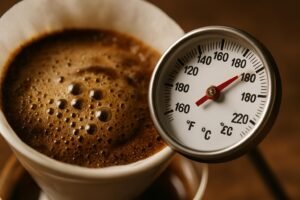
The first secret is the **bloom water temperature**. Instead of using your final brewing temperature, you will use water that is significantly cooler—around **185°F (85°C)**. The purpose of this cooler water is not to extract flavor, but to saturate the grounds and initiate the release of CO2 without prematurely dissolving the delicate flavor compounds. Use a low water-to-coffee ratio for this phase, typically **2:1**. For example, if you are using 20 grams of coffee, you will use 40 grams of 185°F water. Pour this water evenly over the grounds, ensuring full saturation, and then let it sit for a full **45 seconds**. This extended, cooler bloom phase is the first layer of the secret, setting the stage for a cleaner, more controlled extraction. It’s a technique that many baristas use to “de-gas” older beans, but it works wonders on fresh beans by smoothing out the initial extraction. This is a subtle but powerful adjustment that dramatically impacts the final cup.
Step 2: The Full Extraction (The Perfect Temperature)
After the 45-second bloom, the grounds are ready for the main event. Now, you switch to your **main brewing temperature**, which should be between **200°F and 205°F (93°C and 96°C)**. This is the temperature range where the desirable acids, sugars, and oils are most efficiently extracted. The thermal shock from the cooler bloom water to the hotter brewing water creates a more uniform extraction across all the coffee particles, even those that might have been slightly less saturated initially. You will then proceed with your regular pour-over technique, dividing the remaining water into two or three even pours. The key is to maintain a steady, even flow, ensuring that the water level never drops below the coffee bed. This is where the gooseneck kettle becomes essential, allowing for the precise control needed to maintain an even extraction.
The Barista’s Rationale: Why It Works
Why does this two-temperature method work so well? It’s all about managing the extraction curve. The initial, cooler water prevents the immediate, aggressive extraction of bitter compounds that can happen when very hot water first hits dry grounds. It allows the grounds to swell and the CO2 to escape gently. The subsequent jump to the higher temperature then provides the necessary energy to dissolve the complex sugars and acids that give specialty coffee its vibrant flavor. It’s a way of having your cake and eating it too: a smooth, clean start, followed by a powerful, complete finish. This is a level of control that most automated machines simply cannot replicate, which is why the manual pour-over remains the gold standard for showcasing high-quality beans. This technique is a direct application of the principles we discussed in our article on Precision Coffee: How to Adjust Seconds, Grams, and Temperature to Create Your Exclusive Flavor Signature, taking the concept of variable control to its most impactful conclusion.
Beyond the Recipe: The Importance of the Grind
It’s crucial to remember that even the most secret barista recipe is only as good as the ingredients and equipment used. The grind, in particular, is non-negotiable. For this recipe, a medium-fine grind is ideal, similar to coarse sand. Consistency is paramount; an inconsistent grind will lead to uneven extraction, where some particles are over-extracted (bitter) and others are under-extracted (sour), completely undermining the precision of the two-temperature method. If you are still using a blade grinder, you are missing out on the fundamental building block of a great cup. A quality burr grinder is the single most important investment a home brewer can make, as it provides the uniform particle size necessary for any precision brewing technique. This is a topic we covered extensively in our guide on The Ultimate Guide to Coffee Grinders: Burr vs. Blade, and its importance cannot be overstated, especially when attempting advanced recipes like this one.
The Final Pour: A Cup of Revelation
The beauty of this recipe is that it’s not a rigid formula but a framework for experimentation. Once you master the two-temperature approach, you can begin to fine-tune the variables based on your specific beans. For lighter roasts, you might increase the main brewing temperature slightly to extract more of the bright acidity. For darker roasts, you might keep the main temperature lower to prevent bitterness. The key is to taste, adjust, and record your results. This is the true spirit of the barista’s craft: not just following a recipe, but understanding the *why* behind it. The result is a cup of coffee that is remarkably clean, complex, and vibrant—a true revelation that proves you don’t need a professional espresso machine to achieve world-class flavor. This is the secret they didn’t want you to know, and now it’s yours to master. It’s a simple technique with a profound impact, turning your morning routine into a moment of true coffee artistry.

Gabriel James is passionate about the world of coffee, with hands-on experience in specialty beans and artisanal brewing. He has worked in local coffee shops and closely observed extraction and service techniques. Today, he uses this blog to share accessible and relevant tips that help beginners understand and better appreciate coffee in their daily lives. His goal is to make learning simple and inspire more people to explore new flavors and methods.